Attention! This page is for future tutors who are interested in teaching at LiTeach. If your application is approved and you are a registered teacher, please visit this page for more detailed information.
Introduction
LiTeach is a marketplace where you can be an independent tutor. There are no set working hours and salaries. As a teacher, you create your profile, write profile information, add an introductory video for students, and start receiving bookings directly from students.
You can see how your profile will be visible to students on this page.
How much you earn on LiTeach depends on your qualifications, teaching skills, and how well you organize your profile. There is no set or limited monthly salary.
Knowing English is not a requirement to become a teacher on LiTeach. The most important pages and phrases are translated to Armenian. Please note, however, that English is the official and original language of the site as it is registered in the US, and operated under the corresponding laws. The legal agreements (Terms and Conditions and Privacy Policy pages) are written in English, and not understanding them does not waive your responsibility to accept them if you decide to register on the site. If you register on the site, it is your responsibility to understand the legal agreements mentioned above, for which, you may use the help of a professional translator.
Knowing English will make using the site easier, and will help you acquire students from different countries.
Every teacher has two accounts – a Student (Learner) account and a Teacher account. Your student account is created automatically during your teacher’s application, and you just need to activate it via the account verification email. Your teacher’s account is only created if your application is approved.
If you have not completed your teacher application, you click the “Apply to Teach” link from your dashboard. The application process is the same:
Aside from having the corresponding higher education, the teacher must have some experience in online teaching and the desire to learn new technologies and methods in the field.
Having an email, a gmail to be more accurate, and being responsive to it is the first requirement as it is the way the platform works. All your notifications about lesson bookings, messages from students and administration, rescheduling and cancellation are communicated through email. A basic understand of enaglish and how internet and computers work such as what is a browser, wifi, mobile data, switching between them when needed, connecting/allowing microphone and speakers to be used, attaching, uploading and downloading files, sharing the screen, etc are also required.
The platform gives a great freedom to teachers to best represent them to parents and students, set up their schedule and rates. With this freedom comes the need for being able to learn how it works and set up the profile correctly. It may take an hour or two to read the instructions and get this done properly, however, if you do not want to devote this time, it is going to be very difficult for you, the students, and for us to have successful online classes and good experience overall.
You must either send a short introductory video about you or a 10-15 min example lesson (this can be a new recording or a fragment from your online tutoring).
Having the video visible to students is optional. None of the videos will be shown on your profile unless you add it there.
Please remember that the introductory video is not for job application purposes but rather to convey your message to the students. Briefly talk about your educational and professional background emphasizing teaching experience, methods, techniques for engaging etc. Mention what levels of the language you have/can teach. For example, speaking, admissions to university, olymiads, IB, specific test such as TOEFL, IELTS, etc.
Here is an example of how it can be done: https://www.youtube.com/watch?v=X9WfTOwx05g
The video can be in any/all languages you feel comfortable teaching the subject.
This video shows how to upload a video on YouTube:
You can conduct your lessons in any language you feel comfortable with.
Work experience, especially online tutoring, is highly desirable but not required to become a teacher at LiTeach. If you are, for example a new graduate of a University, we need more information than a copy of your diploma to evaluate your application. What advantages do you have over other applicants with diplomas? Do you have excellent grades, communication skills, an olymic medal or something else? Please add the transcript of your diploma to your application and a short introductory video to help up evaluate your candidacy.
If you do not hear from us 14 days after submitting your application, it means it has not been approved and is no longer being considered.
Our application pool is very large but have a limited number of candidates that we can accept. There are various reasons for not being accepted as an online tutor such as unqualified applicant, mismatched applicant, lack of experience in the field and/or in online teaching, missing introductory information, missing an introductory video, missing required documents, being unresponsive to emails and many more.
We thank you for your interest in working with us and wish all the best in your professional endeavors.
Application and Paperwork
Every teacher has two accounts – a Student (Learner) account and a Teacher account. Your student account is created automatically during your teacher’s application, and you just need to activate it via the account verification email. Your teacher’s account is only created if your application is approved.
If you have not completed your teacher application, you can click the “Apply to Teach” link from your dashboard. The application process is the same:
From the homepage, click “Apply to Teach”. Add your email address and a strong password, then click “Start Application”:

At this point, you have already created your student profile which needs to be activated. You can activate it after the teacher’s application. Check your mailbox for the verification email sent from noreply@liteach.com or info@liteach.com. Click the “Verify Account” button to activate your account. Make sure to add these emails to your safe list. If you do not see an email from LiTeach, check your spam folder, and mark the email as “Not Spam”.

On the next window, add your personal information, click “Save” then “Next”.

Next, add your biography, a photo, and an introductory video about yourself.

The information in the biography field appears on the “Find a Teacher” page, and it is very important for students, so give it some time to address your best strengths.

The video is optional, however, it is very helpful to best represent your background, and the students really appreciate it. Check this tutorial on how to upload a video on YouTube for help or do a quick search on Google to find other sources.
In the next window, choose the subject(s) you would like to teach and the languages you speak. For each language, choose your proficiency level from the drop-down menu. Don’t forget to save the information.

The last part is adding your education, experience, skills, and expertise. Click “Add to CV” and enter the information for each description:


You can repeat this as many times as necessary to complete your background information:

After providing the information, check the box if you accept the Terms & Conditions and click “Submit”. A confirmation page will appear. Do not forget to activate your account from your email address! Once activated, you can log in to your student account and get familiarized with the platform.

Note: If you already have a student account and want to become a teacher, you click the “Apply to Teach” link from your dashboard. The application process is the same:
During the teacher application, you will need to provide a CV stating your educational and teaching background. Aside from this, you will also need a profile photo and a link to your introductory video. This is what students can watch before scheduling a lesson(s) with you, so it is a very important tool to introduce yourself, mention your education, teaching experience, methods, student success stories, etc.
To add a video about you, upload it on YouTube and copy-paste the link URL in the required field under the “Photos and Videos” tab.

Check this tutorial on how to upload a video on YouTube for help or do a quick search on Google to find other sources.
Yes, we sign an independent contractor agreement. We will send the agreement to you.
Yes, our business is registered in the US, and we need to have a Tax form filled out and signed by you to reduce or eliminate any tax withholding from your earnings. For example, teachers from Armenia do not pay any taxes in the US.
Financial
Lessons and Classes
The following sections are available only for registered teachers.
Every user has two accounts – a Student (Learner) account and a Teacher account. Your student account is created automatically during your teacher’s application, and you just need to activate it via the account verification email. Your teacher’s account is only created if your application is approved.
Ask your students to click the “Rate” button available after completion of each lesson:

Alternatively, your students can always leave a review under their “Completed” lessons tab:

Yes, we are using Lessonspace which has a clean interface and tools for teaching specific topics such as math, coding, music, etc. You can practice it on their demo site as well as watch some tutorial videos:
https://www.thelessonspace.com/demo
Here, you can select from the most suitable tools for your subject and teaching style such as the colors, the board type etc:

To test and practice video conferencing, click the Red button on the bottom-right:

After entering the conference room, make sure to allow the site to use your Cameras and Microphones:

After this, the system will automatically detect the Camera, Microphone, and the Speaker. You can change them if needed. For example, if you have a separate camera connected to the computer, it will likely provide better quality, so you can select from the “Devices” drop-down menu:

You can see the basic and advanced features of the whiteboard, as well as other features in this video tutorial series:
Check this article for more features of LessonSpace:
https://helpdesk.thelessonspace.com/article/231-teacher-guide
Yes, you can save each lesson tab as a PDF. Right-click on the lesson tab, and save it as a PDF or image file:

A lesson is essentially one class normally conducted one-to-one with a student. A group class is a lesson intended for a group of students. The teachers defines the number of seats (how many students can sign up). A class package is a series of lessons/sessions for a group class. For example, if you are preparing a group of students for an entrance exam to a University, you need to create a Class Package.

For example, let’s say the teacher wants to offer a group class that will take place on Mondays and Wednesdays at 6 pm. In this case, the teacher creates a class package and adds as many classes as needed. Each class is added by clicking the “Add More” button and filling in the necessary information.

Remember to add the information for each language you’d like your class to be described by. Save the work after adding the information for each language.

Note: Classes can only be added or removed while creating the package so make sure to check everything correctly. The class information cannot be changed after the first student is enrolled.
Tell your student to visit your profile page and click “Book Now”. On the new screen, they select the subject (if the teacher teaches multiple subjects) and the Time Slot (this is the duration of the lesson) set by the teacher.

Click Next and select how many lessons you’d like to book:

Next, select the time slot(s) and double-check if they match your schedule and communication with the teacher. To cancel a selection, click on the time slot again.

Click Next, and make the payment using a Card, PayPal, or your digital wallet:

Once booked, you can go to your dashboard and find the lesson(s) under the “Lessons” tab:

You will receive email confirmation on your bookings. On your dashboard, you will see the upcoming lesson at the top:
Trial lessons are essential for getting to know the student/teacher. You can offer 45-minute trial lessons by enabling this option under Account Settings. Once activated, enter the price for the trial lesson. For free trial lessons, enter 0.
Note: the price range for trial lessons is set by the administration.

You can offer lessons of 15 min to 2 hours durations. To set the duration of your 1:1 lesson or a group class, navigate to Account Setting > Price:
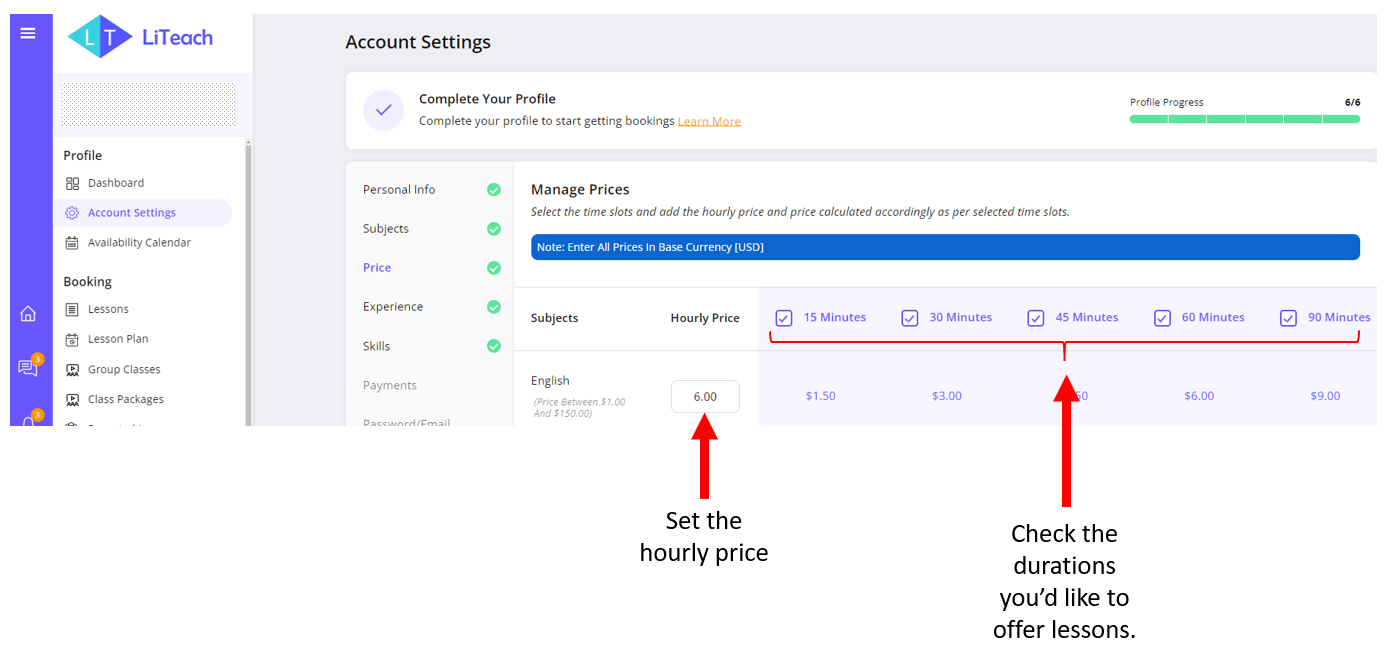
If you are teaching more than one subject, you need to fill out the prices for each subject you teach. Remember to click “Save” button once the information is added.
Yes, in addition to the booking confirmation, both the tutor and student will receive a reminder email one hour before the start time of each lesson. Reminder emails will show a button linked to the correct lesson room. Please include noreply@liteach.com in your email safelist to ensure you receive the emails in your inbox. Mark it as “Safe”, or “Not Spam” if the emails appear in your spam folder.
If you’d like to remind your students about the upcoming lesson, you can also message them from your account and they will receive an email notification.
Please contact us at info@liteach.com with the subject you’d like to teach, and we will add it if it is suitable.
The platform has an in-built messaging app that students and teachers can use to communicate. Please check your email regularly, or turn the notifications on to not miss emails on new messages. The app allows for sending attachments as well which can be used, for example, to send homework files. To access the messaging app, navigate to Account and find the text icon on the left:

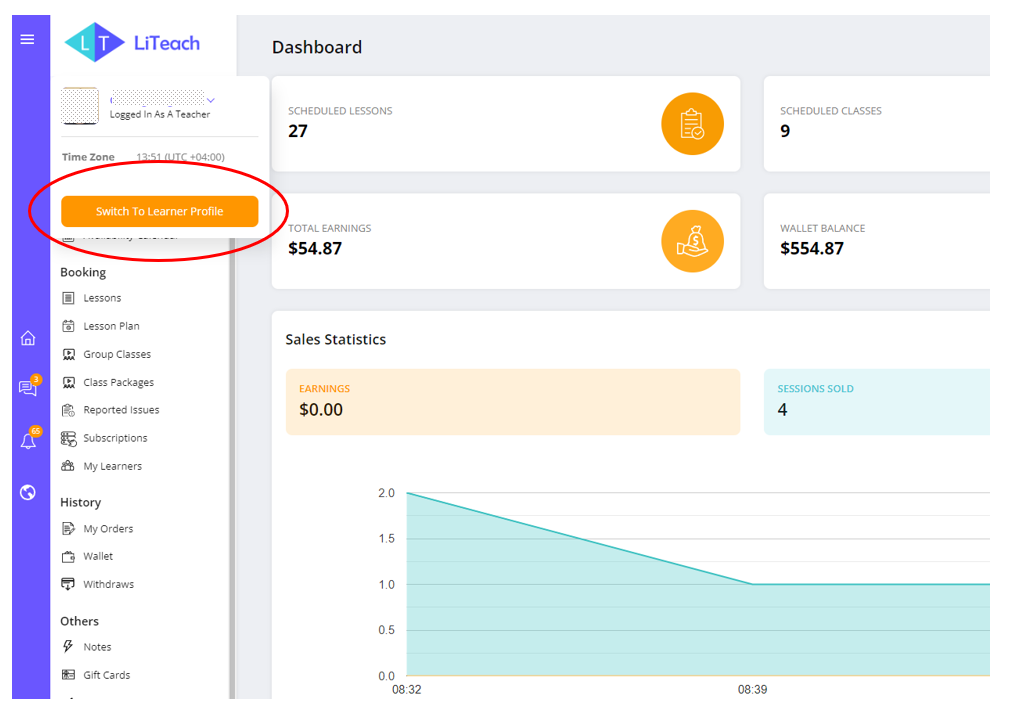
Yes, you can take a lesson(s) or sign up for a group class offered by other teachers. You need to first switch to your learner’s profile – simply navigate to your account and hover over your profile picture:
Once in your student profile, you can book lessons and classes as described in the corresponding articles.
Canceling, Rescheduling, and Refunds
Rescheduling a class means changing its time. It does not involve money redistribution thus it is the easiest and fastest method to deal with a situation where the lesson cannot take place because of unforeseen circumstances.
Canceling means the class is lost and will not take place. This can still be used to reschedule a class if it was done by the teacher with a prior agreement. When the teacher cancels the class, the money is refunded to the student’s Wallet, and they can use it to rebook (Reschedule) the class. Students will receive a full refund if they cancel the lesson at least six hours before its start time. The corresponding action buttons will be shown on the lesson card under the “Lessons” section of your account:
Note to Teachers and Students: In any situation, always communicate with each other to resolve the issue. It is always more polite and productive to cancel or reschedule a lesson with prior notice rather than giving a surprise.

Whether you need to cancel or reschedule a class, it is more polite to communicate with your student/teacher rather than give them a surprise. We are all busy and need to follow our schedules.
Rescheduling: Both the teacher and the student can reschedule a lesson up to six hours before its start time. If there is less than six hours left before the lesson start time, neither the teacher nor the student can reschedule it.
Canceling: If the student cancels the lesson six hours before it starts, they will get a 100% refund. If there is less than six hours left before the start time, the student cannot cancel the lesson as they will get no refund. The teacher can do this, however, that would mean a 100% refund and the teacher won’t get paid. You can do this to give the student the opportunity to rebook the class when there are unforeseen circumstances such as being sick, having a power or internet outage, etc.
It is necessary to establish mutually respectful and understanding work relations with your students, and if they are sick or unable to attend the lesson, canceling it is a nice move.
However, it is up to you to approve this request or not – after all, you spend the time and resources to prepare for your classes.
Please note that if you cancel lessons too often especially less than 6 hours before their start time without a request from your student, we may deactivate your account.
Before canceling a lesson, remember that it will be lost. Rescheduling a lesson is always recommended over canceling it. However, if you need to cancel the lesson, remember that the student will get a 100% refund, and you will not be paid for that lesson. Your students can only cancel the lesson six hours before its start time, so they may ask you to cancel it for them to receive a refund. It is up to you to approve this request or not – after all, you spend the time and resources to prepare for your classes.
Please note that if you cancel lessons too often especially less than 6 hours before their start time, we may deactivate your account.
To cancel a lesson, navigate to your Account page > Lessons > Find the lesson you need to cancel > Click the cancel button > Add your comments, and click submit:
